Masonry 实现原理及链式调用分析
Masonry is a light-weight layout framework which wraps AutoLayout with a nicer syntax. Masonry has its own layout DSL which provides a chainable way of describing your NSLayoutConstraints which results in layout code that is more concise and readable. Masonry supports iOS and Mac OS X.
翻译:
Masonry是一个轻量级的布局框架,它使用更好的语法包装AutoLayout。 Masonry有自己的布局DSL,它提供了一种链式调用的方式来描述NSLayoutConstraints,从而使布局代码更简洁,更易读。 Masonry支持iOS和Mac OS X.
什么是DSL
DSL(Domain Specific Language) 翻译成中文就是:“领域特定语言”。首先,从定义就可以看出,DSL 也是一种编程语言,只不过它主要是用来处理某个特定领域的问题。 下边介绍iOS中如何实现链式调用的DSL。
为什么需要使用Masonry
首先看下直接用NSLayoutConstraints方式布局视图需要什么操作:
例如:我们需要布局一个视图view1,使他距离父视图上下左右都为10,NSLayoutConstraints布局代码如下:
公式:view1.top = superview.top * 1.0 + 10
UIView *superview = self.view;

    UIView *view1 = [[UIView alloc] init];
    view1.translatesAutoresizingMaskIntoConstraints = NO;
    view1.backgroundColor = [UIColor greenColor];
    [superview addSubview:view1];

    UIEdgeInsets padding = UIEdgeInsetsMake(10, 10, 10, 10);

    [superview addConstraints:@[

                                //view1 constraints
                                [NSLayoutConstraint constraintWithItem:view1
                                                             attribute:NSLayoutAttributeTop
                                                         relatedBy:NSLayoutRelationEqual
                                                            toItem:superview
                                                         attribute:NSLayoutAttributeTop
                                                        multiplier:1.0
                                                          constant:padding.top],

                            [NSLayoutConstraint constraintWithItem:view1
                                                         attribute:NSLayoutAttributeLeft
                                                         relatedBy:NSLayoutRelationEqual
                                                            toItem:superview
                                                         attribute:NSLayoutAttributeLeft
                                                        multiplier:1.0
                                                          constant:padding.left],

                            [NSLayoutConstraint constraintWithItem:view1
                                                         attribute:NSLayoutAttributeBottom
                                                         relatedBy:NSLayoutRelationEqual
                                                            toItem:superview
                                                         attribute:NSLayoutAttributeBottom
                                                        multiplier:1.0
                                                          constant:-padding.bottom],

                            [NSLayoutConstraint constraintWithItem:view1
                                                         attribute:NSLayoutAttributeRight
                                                         relatedBy:NSLayoutRelationEqual
                                                            toItem:superview
                                                         attribute:NSLayoutAttributeRight
                                                        multiplier:1
                                                          constant:-padding.right],

                            ]];
Masonry代码如下:
[view1 mas_makeConstraints:^(MASConstraintMaker *make) {
        make.edges.mas_equalTo(superview).with.insets(padding);
}];
由此可以看到使用NSLayoutConstraints方式布局代码及其冗余且不易读。
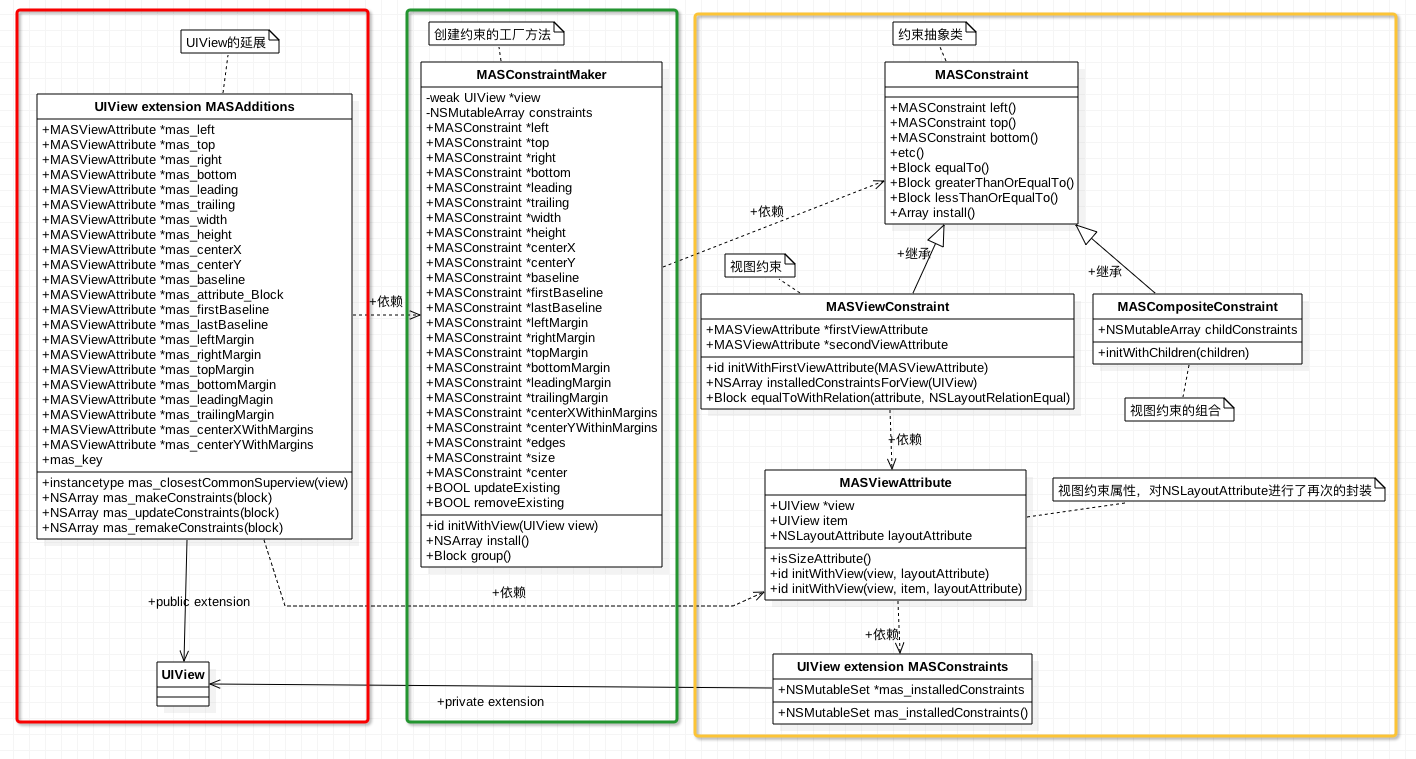
Masonry框架结构分析
主要的几个类:
- View+MASAdditions.h
- MASConstraintMaker
- MASViewConstraint
从调用mas_makeConstraints方法说起
首先我们看一个简单调用的例子:
[view1 mas_makeConstraints:^(MASConstraintMaker *make) {
        make.left.mas_equalTo(superview).offset(10)
}];
mas_makeConstraints:实现如下:首先将self.translatesAutoresizingMaskIntoConstraints置为NO,关闭自动添加约束,改为我们手动添加,接着创建一个MASConstraintMaker对象,通过block将constraintMaker对象回调给用户,让用户对constraintMaker对象的属性进行初始化,其中block(constraintMaker)就相当于我们直接在该方法内部调用make.left.mas_equalTo(superview).offset(10),然后调用install方法对约束进行安装,该方法返回一个数组,数组当中存放约束数组,成员类型为MASViewConstraint
- (NSArray *)mas_makeConstraints:(void(^)(MASConstraintMaker *))block {
    self.translatesAutoresizingMaskIntoConstraints = NO;
    MASConstraintMaker *constraintMaker = [[MASConstraintMaker alloc] initWithView:self];
    block(constraintMaker);
    return [constraintMaker install];
}
紧接着看下block回调回来的操作是如何进行的,也就是下面的这些代码:
make.left.mas_equalTo(superview).offset(10)
点击去看下.left的调用实现:
- (MASConstraint *)addConstraintWithLayoutAttribute:(NSLayoutAttribute)layoutAttribute {
    return [self constraint:nil addConstraintWithLayoutAttribute:layoutAttribute];
}

- (MASConstraint *)left {
    return [self addConstraintWithLayoutAttribute:NSLayoutAttributeLeft];
}
最后调用:
- (MASConstraint *)constraint:(MASConstraint *)constraint addConstraintWithLayoutAttribute:(NSLayoutAttribute)layoutAttribute {
    MASViewAttribute *viewAttribute = [[MASViewAttribute alloc] initWithView:self.view layoutAttribute:layoutAttribute];
    MASViewConstraint *newConstraint = [[MASViewConstraint alloc] initWithFirstViewAttribute:viewAttribute];
    if ([constraint isKindOfClass:MASViewConstraint.class]) {
        //replace with composite constraint
        NSArray *children = @[constraint, newConstraint];
        MASCompositeConstraint *compositeConstraint = [[MASCompositeConstraint alloc] initWithChildren:children];
        compositeConstraint.delegate = self;
        [self constraint:constraint shouldBeReplacedWithConstraint:compositeConstraint];
        return compositeConstraint;
    }
    if (!constraint) {
        newConstraint.delegate = self;
        [self.constraints addObject:newConstraint];
    }
    return newConstraint;
}
其中有一个MASViewAttribute的类,该类其实是对UIView和NSLayoutAttribute的封装
MASViewConstraint是对NSLayoutConstraint的封装,最后将布局约束添加到一个数组当中
block回调执行完毕之后,最后对布局进行安装[constraintMaker install],该方法,最后会调用到MASViewConstraint当中的install方法,其中有一个比较重要的方法:
MAS_VIEW *closestCommonSuperview = [self.firstViewAttribute.view mas_closestCommonSuperview:self.secondViewAttribute.view];
- (instancetype)mas_closestCommonSuperview:(MAS_VIEW *)view {
    MAS_VIEW *closestCommonSuperview = nil;     // 定义一个公共父视图

    MAS_VIEW *secondViewSuperview = view;
    while (!closestCommonSuperview && secondViewSuperview) {    // 遍历secondView的父视图
        MAS_VIEW *firstViewSuperview = self;
        while (!closestCommonSuperview && firstViewSuperview) { // 遍历当前视图的父视图
            if (secondViewSuperview == firstViewSuperview) {
                closestCommonSuperview = secondViewSuperview;   // 找到公共父视图
            }
            firstViewSuperview = firstViewSuperview.superview;
        }
        secondViewSuperview = secondViewSuperview.superview;
    }
    return closestCommonSuperview;
}
该方法是查找两个视图最近的公共父视图,这个类似求两个数字的最小公倍数。如果找到了就返回,如果找不到就返回nil。寻找两个视图的公共父视图对于约束的添加来说是非常重要的,因为相对的约束是添加到其公共父视图上的。比如举个列子 viewA.left = viewB.right + 10, 因为是viewA与viewB的相对约束,那么约束是添加在viewA与viewB的公共父视图上的,如果viewB是viewA的父视图,那么约束就添加在viewB上从而对viewA起到约束作用。
遇到的问题
MAS_SHORTHAND 和 MAS_SHORTHAND_GLOBALS的含义
- MAS_SHORTHAND: 如果我们用
Masonry框架不想写mas_前缀,需要在导入头文件之前定义这个宏 - MAS_SHORTHAND_GLOBALS: 定义这个宏,可以让
equalTo接受基本数据类型,内部会对基本数据类型进行封装
//define this constant if you want to use Masonry without the 'mas_' prefix
#define MAS_SHORTHAND
//define this constant if you want to enable auto-boxing for default syntax
#define MAS_SHORTHAND_GLOBALS
#import "Masonry.h"
Convenience initializer 和 designated initializer
在我们阅读masonry源码的过程中,我们发现有两个初始化方法,注释不太一样,位于MASViewAttribute类下:
/**
 *  Convenience initializer.
 */
- (id)initWithView:(MAS_VIEW *)view layoutAttribute:(NSLayoutAttribute)layoutAttribute;

/**
 *  The designated initializer.
 */
- (id)initWithView:(MAS_VIEW *)view item:(id)item layoutAttribute:(NSLayoutAttribute)layoutAttribute;
这两种初始化的方式有什么区别呢,平时在我们开发当中,我们可能需要通过初始化来确定一些属性的值,并不想由外界来修改它,于是我们可能会需要些很多个initWith方法,加入我的这个对象有姓名、性别、年龄等属性,但是我初始化的时候,并不是所有地方都要知道这些信息,于是我们可能会有initWithUserName:、initWithSex:、initWithUserName:age:等方法,为了管理我们的initWith方法,Apple 将 init 方法分为两种类型:designated initializer 和 convenience initializer (又叫 secondary initializer)
designated initializer 只有一个,它会为 class 当中每个 property 都提供一个初始值,是最完整的 initWith 方法,例如我们在masonry当中也可以看到:
- (id)initWithView:(MAS_VIEW *)view layoutAttribute:(NSLayoutAttribute)layoutAttribute {
    self = [self initWithView:view item:view layoutAttribute:layoutAttribute];
    return self;
}

- (id)initWithView:(MAS_VIEW *)view item:(id)item layoutAttribute:(NSLayoutAttribute)layoutAttribute {
    self = [super init];
    if (!self) return nil;

    _view = view;
    _item = item;
    _layoutAttribute = layoutAttribute;

    return self;
}
最终都会调用到- (id)initWithView:(MAS_VIEW *)view item:(id)item layoutAttribute:(NSLayoutAttribute)layoutAttribute方法
convenience initializer 则可以有很多个,它可以选择只初始化部分的 property。convenience initializer 最后到会调用到 designated initializer,所以 designated initializer 也可以叫做 final initializer
NS_NOESCAPE修饰符
在masonry源码当中,我们看到在修饰block的时候用到了NS_NOESCAPE
- (NSArray *)mas_makeConstraints:(void(NS_NOESCAPE ^)(MASConstraintMaker *make))block;
NS_NOESCAPE用于修饰方法中的block类型参数,作用是告诉编译器,这个block在mas_makeConstraints:方法返回之前就会执行完毕,而不是被保存起来在之后的某个时候再执行
masonry为什么不会引起循环引用
比如我们可能经常会写如下代码:
[self.view mas_makeConstraints:^(MASConstraintMaker *make) {
        make.left.equalTo(self.view.superview).offset(10);
}];
这里为什么不需要写@weakify(self),接着看mas_makeConstraints:是如何实现的:
- (NSArray *)mas_makeConstraints:(void(^)(MASConstraintMaker *))block {
    self.translatesAutoresizingMaskIntoConstraints = NO;
    MASConstraintMaker *constraintMaker = [[MASConstraintMaker alloc] initWithView:self];
    block(constraintMaker);
    return [constraintMaker install];
}
从代码中可以看到,block强引用了self,但是在mas_makeConstraints:方法中self并没有直接或间接持有block,而是直接调用block(constraintMaker),所以不会引起强引用
链式调用实战应用
在我们开发过程中,我们会经常用到UILabel,每次初始化都要设置一堆的属性,比较麻烦,当然我们也可以采取类似如下方法:+ (UILabel *)createLabelWithFont:(UIFont *)font andTextColor:(UIColor *)color andDefaultContent:(NSString *)content,但是一旦我们所需要初始化的参数比较多时,就会造成方法参数非常多,甚至我们有些参数根本不需要初始化,用链式编程该如何实现呢??
- 首先为
UILabel创建一个category,#import "UILabel+zjLabel.h",代码如下:
#import "UILabel+zjLabel.h"

@implementation UILabel (zjLabel)

+ (UILabel *)zj_createLabel:(void (^)(UILabel * _Nonnull))block{
    UILabel *label = [UILabel new];
    block(label);
    return label;
}

- (UILabel *(^)(NSString *))zj_text{
    return ^(NSString *str){
        self.text = str;

        return self;
    };
}

- (UILabel *(^)(UIFont *))zj_font{
    return ^(UIFont *font){
        self.font = font;
        return self;
    };
}

- (UILabel *(^)(UIColor *))zj_textColor{
    return ^(UIColor *color){
        self.textColor = color;
        return self;
    };
}

- (UILabel *(^)(NSTextAlignment))zj_textAlignment{
    return ^(NSTextAlignment aligment){
        self.textAlignment = aligment;
        return self;
    };
}
在需要的地方调用方式如下:
UILabel *label = [UILabel zj_createLabel:^(UILabel * _Nonnull label) {
        label.zj_text(@"haha").zj_font([UIFont systemFontOfSize:24]).zj_textColor(UIColor.redColor);
    }];

[superview addSubview:label];
不需要初始化的参数可以直接不写,只初始化我们需要的
总结
另外很多人担心自动布局的性能问题,事实上苹果已经在iOS12中对auto layout进行优化:
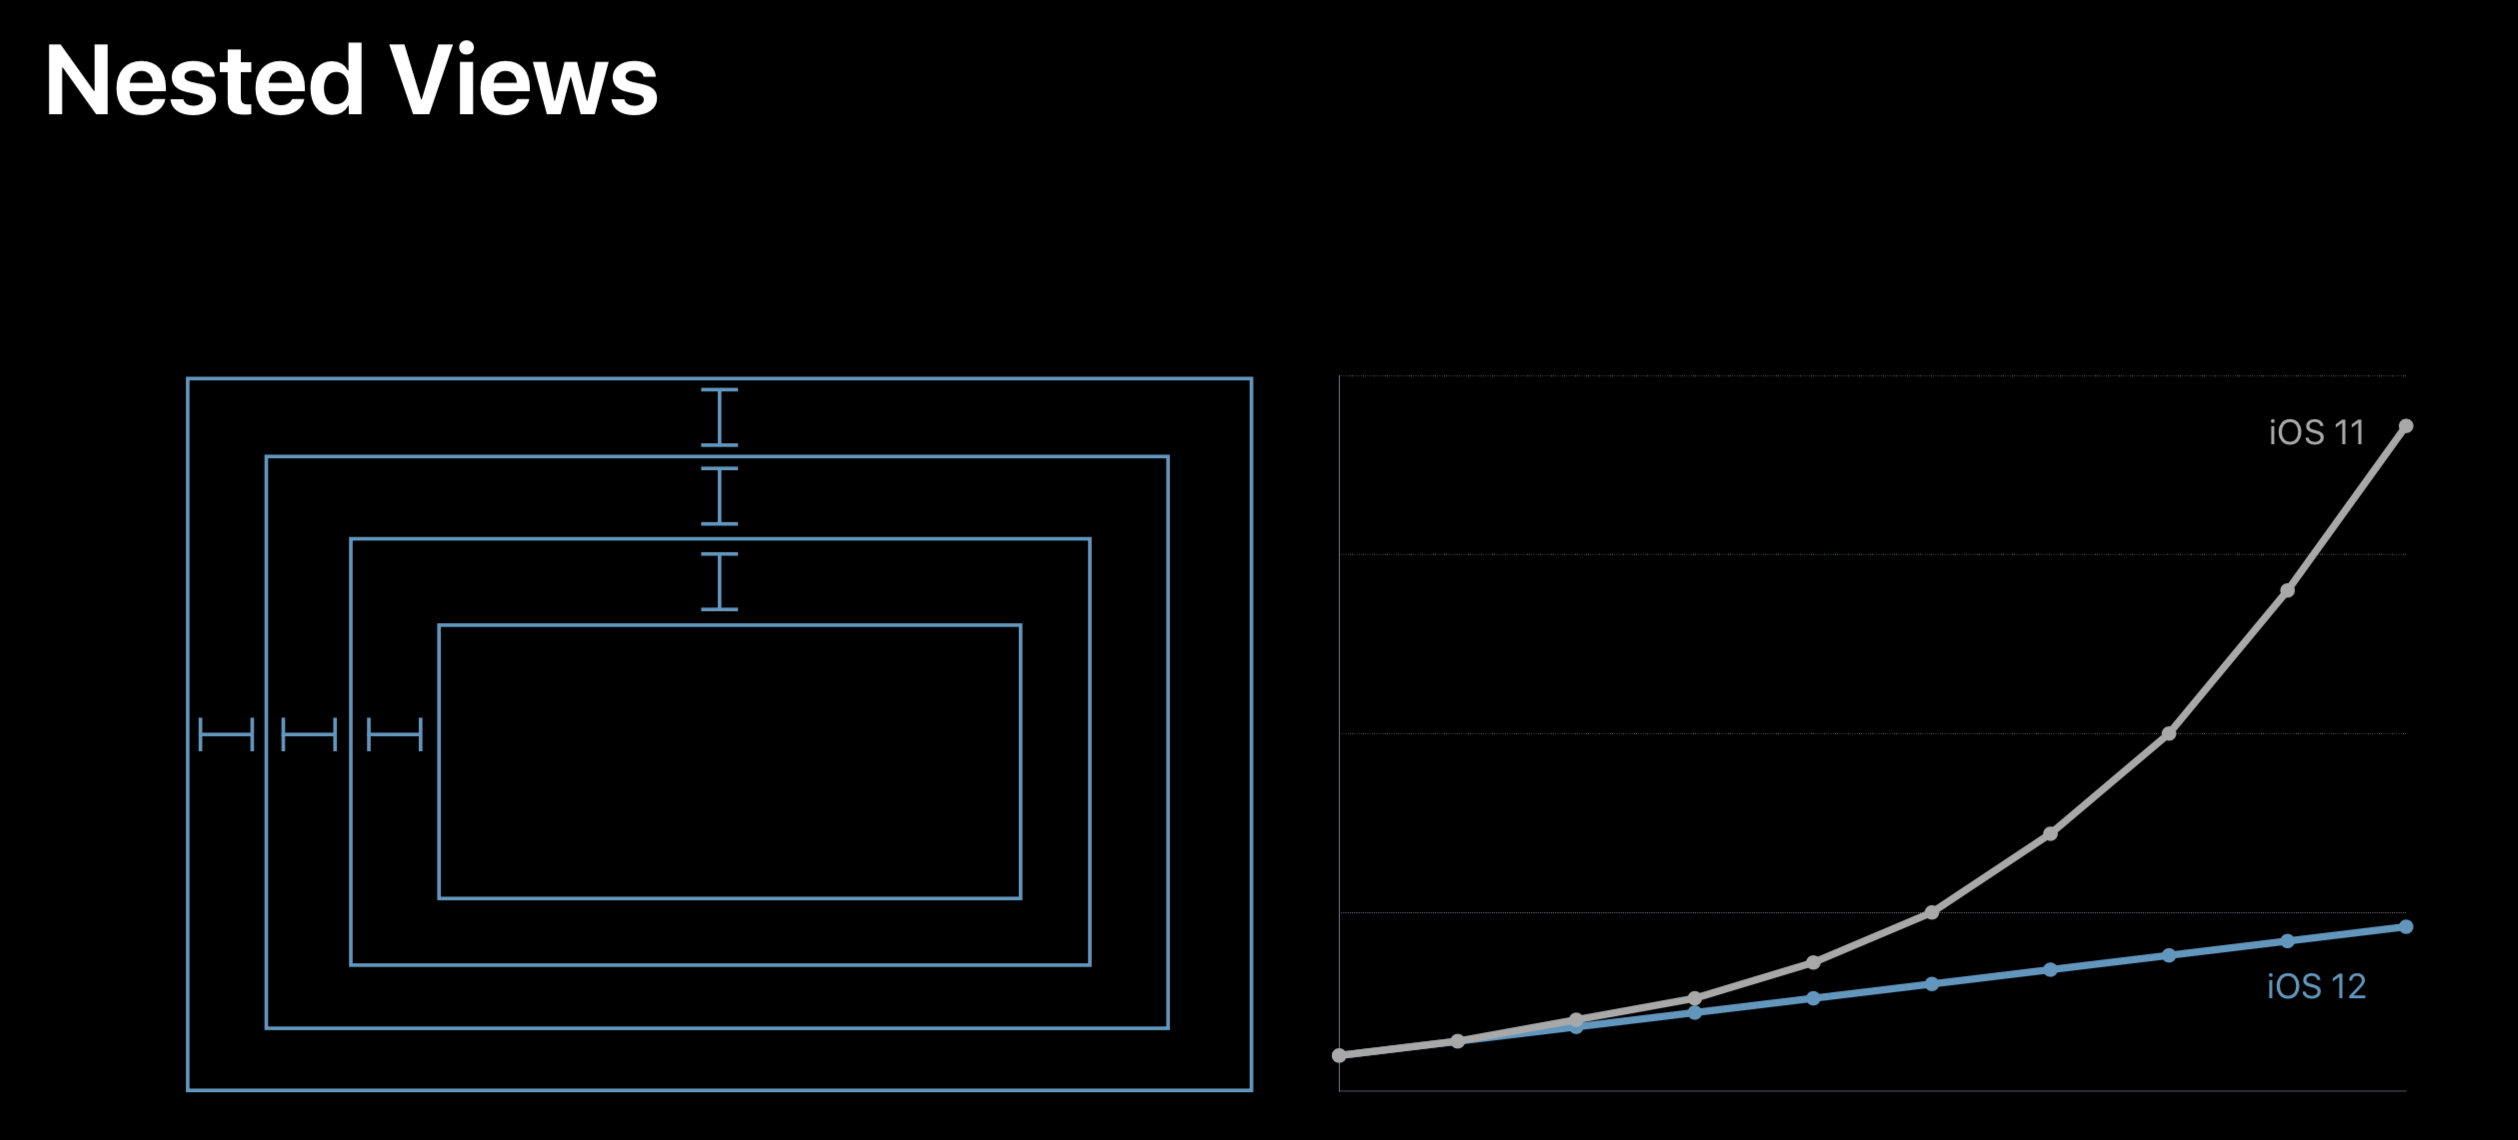
可以看到在iOS12之前auto layout性能会随着嵌套视图的增加呈指数增长,但是在iOS12上苹果官方已经对此进行了优化,随着嵌套视图的增加性能问题得到了大幅的提升。
链式编程的特点:方法返回值是block,而且该block必须有返回值,返回值就是对象本身,block也可以输入参数
另外Masonry框架分析部分,做了简单的分析,想要看详细的参考下方链接,作者写的太详细了,我都不知道写啥了。。。。。
Refrence:
https://www.cnblogs.com/ludashi/archive/2016/07/11/5591572.html